Keto Speedy Smores

Recipe Notes

Finally! We have keto smores that can be made with pre-made ingredients…which means you can make them fast! Choczero released keto marshmallows that TOAST in December of 2023 and they are awesome!

These are fantastic but the problem is you’ll want S’MORE! Okay, but honestly I do put this in the category of “I could eat this all day, I can’t keep it in the house”. I also want to warn you the marshmallows are pretty high in fiber–which can lead to an upset stomach if you’re not used to it. I’d suggest you just eat a smore or two and see how you feel.

Microwave vs Stovetop vs Fire

The microwave is obviously much easier and faster, but it won’t give you the toasted campfire crunch on the outside. If you want that crust on the outside of your marshmallow you can toast them with the heat of the stove! This is probably pretty obvious if you have a stove with a flame, but this also works with an electric stove. 

If you’re wanting to have the full fire experience within your home you can pick up a smores maker for pretty cheap. I like the Sterno smores maker because it has a mesh for safety. Although I have to admit the mini fire pit style one next to 3 serving plates would be pretty cool for a party.

I don’t recommend you use a candle! Candles have stuff in them like scents and oils that will make your marshmallow taste awful and may not be safe. I also don’t recommend a lighter because they can get too hot from keeping them on long enough to toast a marshmallow. 

Nutrition 

2 Net Carbs per Smore = 1 carb from the chocolate + 1 carb from 2 cookies

The marshmallows are mostly made of fiber so the net carbs from them are very negligible, less than 1 net carb.

Keto Speedy Smores

Ingredients

Microwave Instructions

  1. Place the 2 snickerdoodle cookies onto a plate with the flat side up.
  2. Place the piece of chocolate on top of one of the cookies. You want the choczero logo facing up–the ridge on the chocolate helps keep the marshmallows in place.
  3. Place the plate into the microwave before you add the marshmallows. It makes it easier to balance them.
  4. Put the 2 marshmallows side by side on top of the chocolate.
  5. Microwave on high for 20-30 seconds (until the marshmallows get big)
  6. Take the plate out of the microwave and put the other cookie on top of the marshmallows. It should be sticky now so it should stay in place easily.
  7. Enjoy! Be warned these are sticky and a bit melty and can make a bit of a mess.

Stovetop Instructions (Fire is very similar)

  1. Place the 2 snickerdoodle cookies onto a plate with the flat side up.
  2. Place the piece of chocolate on top of one of the cookies. You want the choczero logo facing up–the ridge on the chocolate helps keep the marshmallows in place.
  3. Turn on your stovetop to medium. While it’s heating up you can put your 2 marshmallows onto a roasting stick . You can use a long fork or a reusable skewer in a pinch.
  4. Place the marshmallows over the heat of the stove. Be careful to keep your hand back and away from the heating element. As the part of the marshmallow facing the stove begins to turn brown rotate the marshmallows so you can start browning the other sides. Continue to rotate until the entire marshmallow is as brown as you’d like it to be.
  5. Turn off the stove.
  6. Place the marshmallows with the stick against the chocolate. Put the 2nd snickerdoodle cookie on top of the marshmallows and push down at an angle to help scrape the marshmallows off of the roasting stick.
  7. Enjoy! Be warned these are sticky and a bit melty and can make a bit of a mess.
  8.  

Microwave Easy Killer Keto Hot Chocolate

keto hot chocolate


RECIPE NOTES

I tried so many hot chocolate recipes when I got on keto, and I hate to say it but most of them were chalky, lacked flavor, had bad ingredients, or wanted me to set up a double broiler. NOT TODAY MY FRIENDS. The hot chocolate is creamy and full of flavor. And we’re making it in the microwave! Although you can certainly make it stovetop if you’re wanting to make a big batch. This is a pretty forgiving recipe if you get the measurements slightly off.

Most of the premade hot chocolates I’ve found don’t really work for me. They use sugar alcohols which tend to give me an upset stomach or have weird aftertastes. Or just flat-out add brown rice(seriously why). Small shoutout to Primal Kitchen Collagen Fuel Chocolate Coconut for being the best hot chocolate premade mix if you want one. The ingredients are clean and it’s the one I drank for a long time before I figured this recipe out. The packets are great for a gift basket or on the go. But even that one tastes a bit off from your traditional silky high-quality hot chocolate because of the collagen.

For the #unsweetketochallenge I actually drink this pretty frequently with no sweetener at all. It took a little getting used to, but I think the cream and saltreally tempers the bitterness. 

INGREDIENTS

  • Unsweetened Baker’s Chocolate – The biggest thing to look for is that it’s unsweetened. You can generally find this in the baking aisle at the grocery store.
  • Sweetener – Monk Fruit Drops are my goto sweetener for this recipe and most hot drinks. They’re low carb but not hard on your stomach like sugar alcohols can be. I actually weaned myself off of sweetener by using fewer drops over time and now I don’t even need sweetener to enjoy the hot chocolate.
  • Heavy Cream – Get what you can afford. But if you can, get a heavy cream that is JUST cream and doesn’t have thickeners. Organic, grassfed, grass-finished, and humane are also nice-to-haves. Still, even the cheapest cream is better than eating carby junk!
  • Butter – Get what you can afford. Organic, grassfed, grass-finished, and humane are nice-to-haves. Absolutely do NOT get butter substitutes made from unhealthy vegetable oils. The butter prevents the chocolate from seizing and burning while adding some depth to the flavor.

EQUIPMENT

  • Microwave – Really, any microwave where you can see through the door will be good enough. But if you need a new one, The Toshiba Microwave+AirFryer+Convection Oven will save you a lot of counter space.
  • Coffee Mug – Make sure it’s a microwave-safe mug. I really like owning a good set of stoneware mugs because they’re nonstick and very temperature resistant. So you can use them in the oven and they’re safe in the dishwasher. They’re cups that last. Glass mugs are another great alternative, and as a bonus they make for a really nice presentation. However, most glass mugs are not oven-safe.
  • Spoon – Just a regular metal spoon. Don’t put plastic spoons into hot liquid. Don’t microwave metal.

PAIR WITH

Optional Add-Ins

  • A shake of Pumpkin Spice will give you a nice fall spice flavor.
  • Want a peppermint hot chocolate? The easiest way is to use Food Grade Peppermint Oil. You could also probably use Peppermint Leaf Powder, which also avoids any potential bad oils. You could also use a bar of Peppermint Choczero instead of the unsweet baker’s chocolate, although it can somewhat affect the boiling/texture. You can use Peppermint Extract when you add the water, but the alcohol adds an unpleasant aftertaste since it doesn’t really cook off. 
  • Chili Powder – Add just a dash to get a kick of heat.

Microwave Easy Killer Keto Hot Chocolate

  • Reminder: Don’t leave the spoon in the cup, metal doesn’t go in the microwave!
  1. Place the chocolate and butter into a mug. Microwave 30 seconds.
  2. Stir the chocolate and butter until it’s fully mixed and smooth.
  3. Add the heavy cream. Stir a bit and wipe your spoon on the side of the mug but it won’t mix together yet.
  4. Make sure you can see into the microwave. You’re going to microwave the cream until you see it boil up almost to the top of the cup and stop it. Usually about 1 minute.
  5. Stir about 30 seconds. You’ll notice the chocolate is now blending much more easily with the cream. Pressing the spoon against the side of the cup can help mix it better.
  6. Boil the cream almost to the top of the cup again.
  7. Stir until you get a smooth consistency (about 30sec – 1 min) with the chocolate and cream. 
  8. Add water to fill the cup up the rest of the way.
  9. Microwave 1 minute. 
  10. Enjoy!

Keto Microwave Panna Cotta

Recipe Notes

Fresh berries sit on top of a deliciously creamy and smooth custard flecked with vanilla beans.

This is a delightfully easy dessert to make but it does require chill time in the fridge. 

Ingredients

Heavy Cream- As the main ingredient, a high-quality heavy cream goes a long way here. But get what you can afford! If you can, look for a heavy cream where the only ingredient is cream and doesn’t contain any thickeners like carrageenan or xanthan gum. Some nice to haves are: in a glass jar instead of plastic, organic, grass-fed, and humanely treated.

GelatinThis is a type of collagen and it makes this a great-for-you dessert. It is what gives your panna cotta the correct texture.  The main thing to look for is that your gelatin powder is JUST gelatin and doesn’t include sugar or fillers. Nice to haves: grass-fed, organic, humanely raised. 

Vanilla – I prefer using Vanilla Bean Powder because it packs more of a vanilla taste into the dish than vanilla extract. It also gives it lovely vanilla bean flecks you’re used to seeing in high end vanilla dishes. However, if you’re in a rush and only have extract it will also work, just double the amount.

Sweetener – Sweetness is really a personal thing, and the further you are in the keto journey the less you tend to need. I prefer not to use any additional sweetener as the berries in this dish provide enough for me. But if you need this dish sweeter I would recommend using monk fruit drops (the fruity aftertaste will be hidden with the berries in this dish) or a granular sweetener like erythritol (will have a cooling effect).

Toppings – Strawberries are just my favorite to pair with this, but you could try raspberries, blueberries, blackberries or your favorite keto fruit. You could even top it with a keto chocolate syrup from Enlightened or a keto caramel sauce from Choczero

Equipment

Pair With

Keto Microwave Panna Cotta (No Sweetener)

  • 1 Cup Heavy Cream
  • 1 teaspoon gelatin
  • 1 tablespoon water
  • 1/8th teaspoon vanilla bean powder
  • about 5 Fresh strawberries, washed, tops cut off, and diced (optional)
  1. In a large shallow dish, pour in 1 tablespoon of warm water. Evenly sprinkle the 1 teaspoon of gelatin over the top of the water and allow it to sit for 10 minutes. It will turn into a gel.
  2. Heat 1/4th cup of heavy cream in your pyrex glass measuring cup for 30 seconds in the microwave. 
  3. Pour the hot heavy cream into the dish with the gelatin and stir well for 1 minute, making sure there are no clumps. If the clumps won’t come out then microwave it for an additional 10 seconds and stir. Repeat until the clumps are gone.
  4. Pour in the rest of the cold heavy cream (3/4th cup).
  5. Add the 1/8th teaspoon vanilla powder and stir.
  6. Chill in fridge for at least 2 hours, until the panna cotta is solid.
  7. Top with diced strawberries

Keto Perfectly Peachy Keen Peach Cobbler (No Sweetener)

Recipe Notes

A warm, crispy pumpkin-spiced topping sits on top of delicious gooey fruit filling, bringing comforting southern flavors together in this low-carb dish.

This peach cobbler has a bit of a twist to lower the carbs– zucchini! But wait, hear me out. When mixed with the peaches and spice and then baked it actually tastes like apples! It provides a bit of a crunch and makes the cobbler go much further. 

Ingredients

Peaches – Fresh peaches are the best if you can get them and take the time to slice and squish them. Frozen peaches are next best, just microwave them til they’re soft so you can squish them. For this recipe, the frozen version being a little mushy doesn’t matter. Canned/vacuum sealed plastic bowl peaches will do if you must but are often less healthy due to the packaging process. However, it’s great if you don’t have freezer space or fresh available. Try to get a type without sugar added, sugar will add to the carb count A LOT. Your best bet is to get canned peaches in 100% juice and then rinse the juices off. Even the fruit juices can double or even triple the carbs in a can!

You may be used to large chunks of peach in your cobbler but it’s pureed and distributed throughout this cobbler to give the most impact for the least amount of carbs.

Zucchini – For this recipe, you want the widest possible green zucchini. The skinnier ones tend to have less flesh and are harder to work with for this recipe. If you feel like 2 cups of zucchini takes too much of the peachy impact out of your cobbler you can cut it down to 1 cup to bring out the flavor. However, it will make the cobbler less filling–you’ll get less per carb.

Sweetener – Sweetness is really a personal thing, and the further you are in the keto journey the less you tend to need. I prefer not to use any additional sweetener because the peaches and lemon juice can bring a lot to the dish. But if you need this dish sweeter or more gooey a granular sweetener mixed into the filling would work. You could also sprinkle some on the topping before baking. I would suggest Lakanto Golden for a brown sugar caramel note. Lakanto’s fruity aftertaste won’t matter in this recipe. Erythritol desserts do tend to taste better after sitting in the fridge overnight, so you may want to wait if you use Lakanto Golden and serve it the next day. If you’re completely avoiding sugar alcohol you could also go with adding a few monk fruit drops into the filling– it won’t really make the filling gooier but you’ll be way less likely to get an upset stomach. You can also just try making it without sweetener and just sprinkle some on after you bake it, then stir. Cobbler is usually kind of a “messy” dessert anyway so you won’t lose too much flavor this way.

Equipment

  • 2 Cup Glass Pyrex Measuring Cup
  • Glass Pie dish – In general a shallow container with a wide top allows it to be gooey at the bottom and crispy up top. If you don’t have one any pan of similar size will do.
  • Rubber Spatula  – You can’t really take the rubber out of a rubber spatula, but this at least has a steel handle to reduce it. It’s also gorgeous.
  • Vegetable Peeler – make peeling the zucchini easy and fast. This is an all-metal peeler so no plastic here.
  • Large Mixing Bowl – For mixing the topping. I like these because they come with lids.
  • Microwave – To melt the butter. If you don’t have one you can just melt it in the oven or on the stove.

Pair With

  • BBQ – Peach cobbler is a traditional southern dessert that goes great after a big BBQ meal. Just make sure you’re using a keto BBQ sauce. My favorite for taste is the GHughes Smokehouse Sugar Free Hickory BBQ Sauce. It’s the most southern-style sauce I’ve found, however it is sweetened with sucralose which is my least favorite keto sweetener health-wise. The Primal Kitchen series of BBQ isn’t quite as tasty but the ingredients are fully paleo. Primal kitchen has quite a few BBQ sauces now too with their other BBQ Pack. Try making an easy BBQ bowl by getting cauliflower mash, putting shredded pork or brisket, keto BBQ sauce, and cheese on top. Then treat yourself to this for dessert with some iced keto sweet tea and you’ll be having a real southern feast. 
  • Vanilla Ice Cream My favorite keto brand is Rebel Ice Cream. Place a scoop on top of fresh out of the oven peach cobbler and you’ll have a to-die-for dessert. Just keep in mind this ice cream does contain sweetener so if you’re currently avoiding sweetener you should skip it.

Keto Peachy Keen Cobbler (No Sweetener)

For the filling

  • 2 tablespoons butter
  • 1 Cup of Peaches or 1 Can of Peaches (15 oz / 425g) 
  • 1.5 cups prepped zucchini (about 1-2 large green zucchini)
  • 1/2 Cup Heavy Cream
  • pinch salt
  • 1 tablespoon lemon juice
  • 1 teaspoon vanilla extract
  • 1 tablespoon pumpkin spice
  • Optional: Sweetener (see ingredient notes)

For the topping/crust

  • 2 Cups Almond Flour
  • 1/2 Cup Coconut Flour
  • 1 tablespoon pumpkin spice 
  • 1 tablespoon baking powder
  • 6 tablespoons melted butter
  • 1/2 cup heavy cream
  • 1 tsp vanilla extract
  • 3 eggs
  • Optional: Sweetener sprinkled on top (see ingredient notes)
  1. Start with the filling. Melt 2 tablespoons of butter in the glass pie dish in the microwave.
  2. Rinse the zucchini, then peel the skin off into a plate. Zucchini is soft so you can even just use a butter knife for the next parts. Chop off the ends of the zucchini to remove the hard parts. Next, use a spoon to scoop out all of the seeds onto the plate. You can throw the skin, ends, and seeds into your yard/garden to compost. Rinse your plate.
  3. You should have scooped out zucchini now. Flip it over and you can easily cut vertically and then horizontally to dice the zucchini into small cubes, about 1/4th inch x 1/4th inch. Think of desserts where you’ve had small apple chunks, it’s like that size. Add the diced zucchini to the measuring cup, you need about 2 cups of this diced zucchini. If there’s extra you can put it in a bag and throw it in the freezer for next time.
  4. If you’re using canned peaches– remove the lid and pour them into a strainer. Rinse them with cold water to remove all the high-carb juice. 
  5. If using fresh or frozen peaches you’ll need to cut up the peaches and then puree them. You can do this in a blender, squishing it by hand, putting it into a ziploc bag and squshing it, or putting it into a bowl and mashing it with a fork. You should have 1 cup of peach puree when you’re done. Pour this into the pie dish on top of the zucchini. 
  6. Add the heavy cream, lemon juice, vanilla extract, pumpkin spice, and salt to the pie dish for the filling. Stir it all up.
  7. Turn on the oven to 350F so it can preheat while you make the topping.
  8. In a separate large mixing bowl, mix the almond flour, coconut flour, pumpkin spice, and baking powder.
  9. Put the 6 tablespoons of butter into the glass measuring cup and then microwave it until it’s fully melted. (about 30 seconds – 1 minute)
  10. Pour the butter on top of the dry ingredients in the mixing bowl.
  11. Measure out your heavy cream into the measuring cup and then add it to the mixing bowl.
  12. Add the vanilla extract. Stir until well combined.
  13. Lastly, add the eggs. Adding these last prevents the eggs from cooking from the heated butter. Stir until well combined, you will have a “sticky cookie dough” type texture. The topping mix is now complete.
  14. You’ll be adding “dollops” of the topping mix to the top of the filling. This helps give it texture and creates air pockets to give extra crispiness. To do this take a big scoop of the mix onto the rubber spatula and then use a spoon to just tear off a tiny bit of dough and let it drop onto the top of the filling. Repeat making these dollops or “little chunks of dough” until you’ve used up all the topping mix. Try not to have them be flat, it’s the “tearing” that gives it the crumbly texture.
  15. Bake in the oven for 30 minutes, or until the entire topping is golden brown. You may want to set a timer for 25 minutes and then keep an eye on it so you can find out how long it takes for YOUR oven.

Keto Low Carb Pumpkin Pasties (Harry Potter Inspired)


Buttery and flaky crust is wrapped around a sweet and creamy pumpkin filling that hits you with the taste of autumn spice.

I’m going to Universal Orlando later this year and one of my favorite sections is the Harry Potter area. Between Hogsmeade, Hogwarts, and London there are LOADS of food goodies that I grew up reading about. I remember as a kid drooling over the idea of Harry’s feasts in the Great Hall and wishing that I could take a trip to Hogsmeade to buy magical candies from Honeydukes. Now as an adult I know that the in-park carb packed Pumpkin Pastie is going to have me feeling bad while I’m on vacation. This low carb keto pumpkin pastie will allow you to have the feast you want. As of this writing you can even let them know you’re on a special diet and they’ll let you bring this into the park(you should double check their rules if you’re going). So you could head over to the Three Broomsticks, grab one of their more protein-packed meals and have this pastie for dessert!

Recipe Notes

Not going to lie, this recipe is a fair amount of work! If you’ve ever made a wheat flour pie crust you’ll be familiar with how pastry needs to be constantly kept cold. So make sure you have room in your freezer and lots of time. Work quickly to make the pie crust as flaky as possible. While the recipe is long it’s really just to make sure you know how to do everything right. It’s not really a complicated recipe or tricky other than keeping things cold. 

Ingredients

Apple Cider Vinegar — The main thing with this is you want one that is “with the mother”. Bragg Organic Apple Cider vinegar is a popular choice.

Mascarpone cheese — you may be familiar with using cream cheese for fathead dough but this recipe calls specifically for mascarpone cheese because it is less “sour” than cream cheese. In such a delicate sweet pastry the sourness of cream cheese can be overpowering. Still, if for some reason you can’t get mascarpone cheese in your area you could make this recipe with cream cheese. It just won’t taste as good as it will have a slightly sour aftertaste.

Sweetener Options

Monkfruit drops are low carb and easy to use. I chose this sweetener because it’s easier on the stomach than sugar alcohols and when I go to universal I want to be able to eat several without worrying about a stomachache. It also tastes great fresh out of the oven, no need to wait! My brand is 6 drops = 1 teaspoon of cane sugar and that varies by brand so you may need to take that into account.

Swerve Brown which is a keto replacement for brown sugar would probably be another great option. Just sweeten the pumpkin mixture, stir it and taste it to see if it’s as sweet as you like. Keep in mind this is mostly erythritol so I suggest just eating one pastie and seeing how you feel if you’re not used to sugar alcohols, as a lot can upset your stomach. You will also often find with erythritol sweeteners that the dessert tastes better the next day.

Erythritol can also be used but I would recommend sitting this in the fridge overnight before you eat it to reduce the cooling effect of erythritol. Just sweeten the pumpkin mixture, stir it and taste it to see if it’s as sweet as you like. I suggest just eating one pastie and seeing how you feel if you’re not used to sugar alcohol, as a lot can upset your stomach. You will also often find with erythritol sweeteners that the dessert tastes better the next day.

Equipment

Rolling Pin – I really recommend you get a rolling pin with thickness-size rings on the end so you can get a nice evenly rolled pie crust. The rolling pin I use is stainless steel and even came with a silicone brush which is useful for the eggwash.

Parchment Paper- This dough is pretty sticky even with a steel rolling pin, you’ll need parchment paper to roll the dough and to bake the pasties.

Cookie Cutters / 4 inch Mini Tart Pans – You’ll need to cut the dough into shape. I actually just use my mini tart pans since it means I have to have less clutter in the kitchen. It makes them about the right size for a hand pie. (about 4 inches around) In a pinch you could cut the circles with the back of a butter knife but it doesn’t work nearly as well (and will impact the flakiness of the crust negatively because it takes longer)

Cookie Sheet – To bake the pies on. It will also need to fit into your freezer. I prefer a ceramic coating for a healthier nonstick surface than teflon.

Food Processor/Blender – The dough is far easiest to make in a KitchenAid Mixer. If needed you can simply stir the dough together with a fork, but it will take quite a while. 

Freezer space – You’re going to have to roll out the dough and freeze it repeatedly. Make sure you have space in your freezer to do this.

Mixing Bowl – Plastic isn’t great for you and you’ll need to mix the ingredients. I like these metal bowls with lids. They have a nonstick bottom, a handle, and a pouring spout. It’s superior to glass since it’s harder to break, but a glass mixing bowl is great too.

Goes Great With

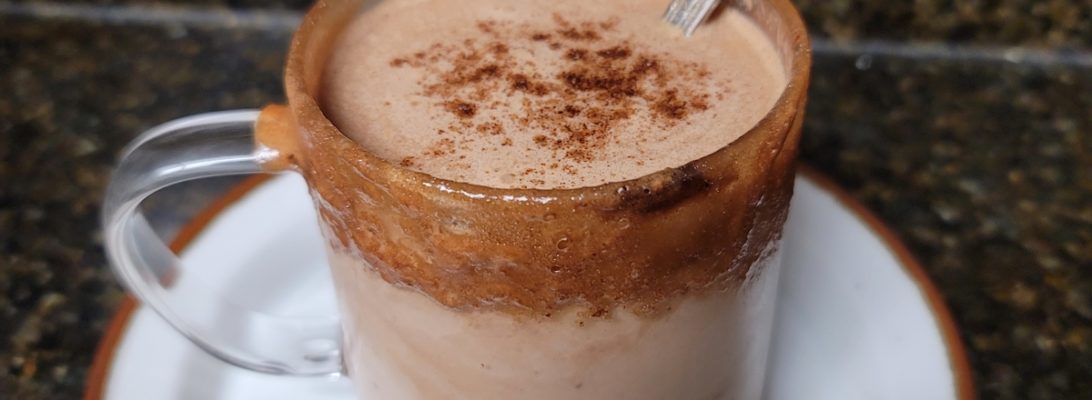
Hot Chocolate –  Make a keto hot chocolate and add some pumpkin spice or cinnamon for a fall kick. Add some Jordan’s Skinny Syrup Butter Toffee syrup for a butterbeer experience without all the sugar.

Breakfast – This actually makes a great breakfast pastry as it’s fairly savory. Try it with some bacon, eggs, and coffee.

Keto Low Carb Pumpkin Pasties (Harry Potter Inspired)

For the Dough
For the Filling

This amount of filling is enough for about 2-3 batches of dough depending on how much filling you use. I made the recipe this way because it’s based on a can of pumpkin puree. You can freeze leftover filling til the next time you make pie dough.

  1. If you have a strong electric mixer like the KitchenAid Mixer, then you can dice up your butter and mascarpone cheese and freeze it. If you’re making this recipe by hand with a whisk/fork skip this step or if you want an EXTRA flaky crust freeze your butter and mascarpone cheese then shred it with a cheese grater and put it back into the freezer for step 3. You can skip this step to save on effort, it will still taste great but be less flaky. 
  2. Add almond flour, coconut flour, salt, pumpkin pie spice, and xanthan gum to bowl and mix well. You want everything to be as evenly combined as possible for the dry ingredients. Chunks of xanthan gum in particular will throw off the texture a lot, so sprinkle that over the top of all the other ingredients to help spread it out.
  3. Add the butter and mascarpone cheese to the bowl and mix until it’s just barely brought together, it will be crumbly. Try to work quickly to keep the butter as cold as possible. You’re looking for a coarse breadcrumb texture that is the butter and mascarpone cheese coated in the powder. Not a cookie dough texture.
  4. Add in 1 egg, 12 monkfruit drops, and apple cider vinegar and mix until the dough just begins to come together–but don’t overmix it into a solid paste. The unevenness of the dough helps with texture and also allows you to work faster so that the butter stays cold.
  5. Once done push all the mixture down into the bottom of the bowl. Cover the bowl with a lid or plastic wrap and put it in the refrigerator for at least an hour. I suggest letting it sit overnight. You can keep it like this for up to 3 days if needed. You can also freeze the pie crust and thaw it out as you need.
  6. Put your rolling pin in the freezer so it’s nice and cold for when you’re ready to work with the dough. I recommend using size rings at 3mm. You can also freeze your cookie cutters/whatever you’re using to cut the shapes.
  7. You can create the filling while the dough rests in the refrigerator. If making this ahead of baking time I wouldn’t store this in the refrigerator more than a day ahead of time because the pumpkin tends to get an off taste. The filling is simple enough– mix all of the filling ingredients in a bowl. You can use a spoon to get small tastes to test how sweet you would like it to be.
  8. Once the dough is rested–Wet your counter with a few drops of water and put down a sheet of parchment paper. The water will keep the parchment paper in place. Take out about 1/3rd of the dough and put it on the parchment paper and return the rest to the fridge. Then put another sheet of parchment paper on top of the dough. 
  9. Use the rolling pin to roll the dough out to 3mm, try to get the dough to be evenly the same size.
  10. Once you’ve flattened the dough you can pick up the parchment paper with it and put it in the freezer for about 10 minutes. Try to keep it flat or it will get wrinkles and you’ll have to reflatten and refreeze.
  11. Line a cookie sheet with parchment paper. The cookie sheet will need to go into the freezer later so make sure it fits.
  12. Work quickly during this next part: Take the dough out of the freezer, remove the top layer of parchment and set it aside, we will reuse it later. Press the cookie cutter/tart tin into the dough to make circles and move it onto the parchment paper on top of the cookie sheet. Sometimes using a spatula can help you move it over but be careful as it can tear the parchment paper. If the dough starts to scrunch when you try to move it over you need to put it back in the freezer again for 10 minutes. Leave at least an inch between the pie crust rounds, but they don’t spread very much.
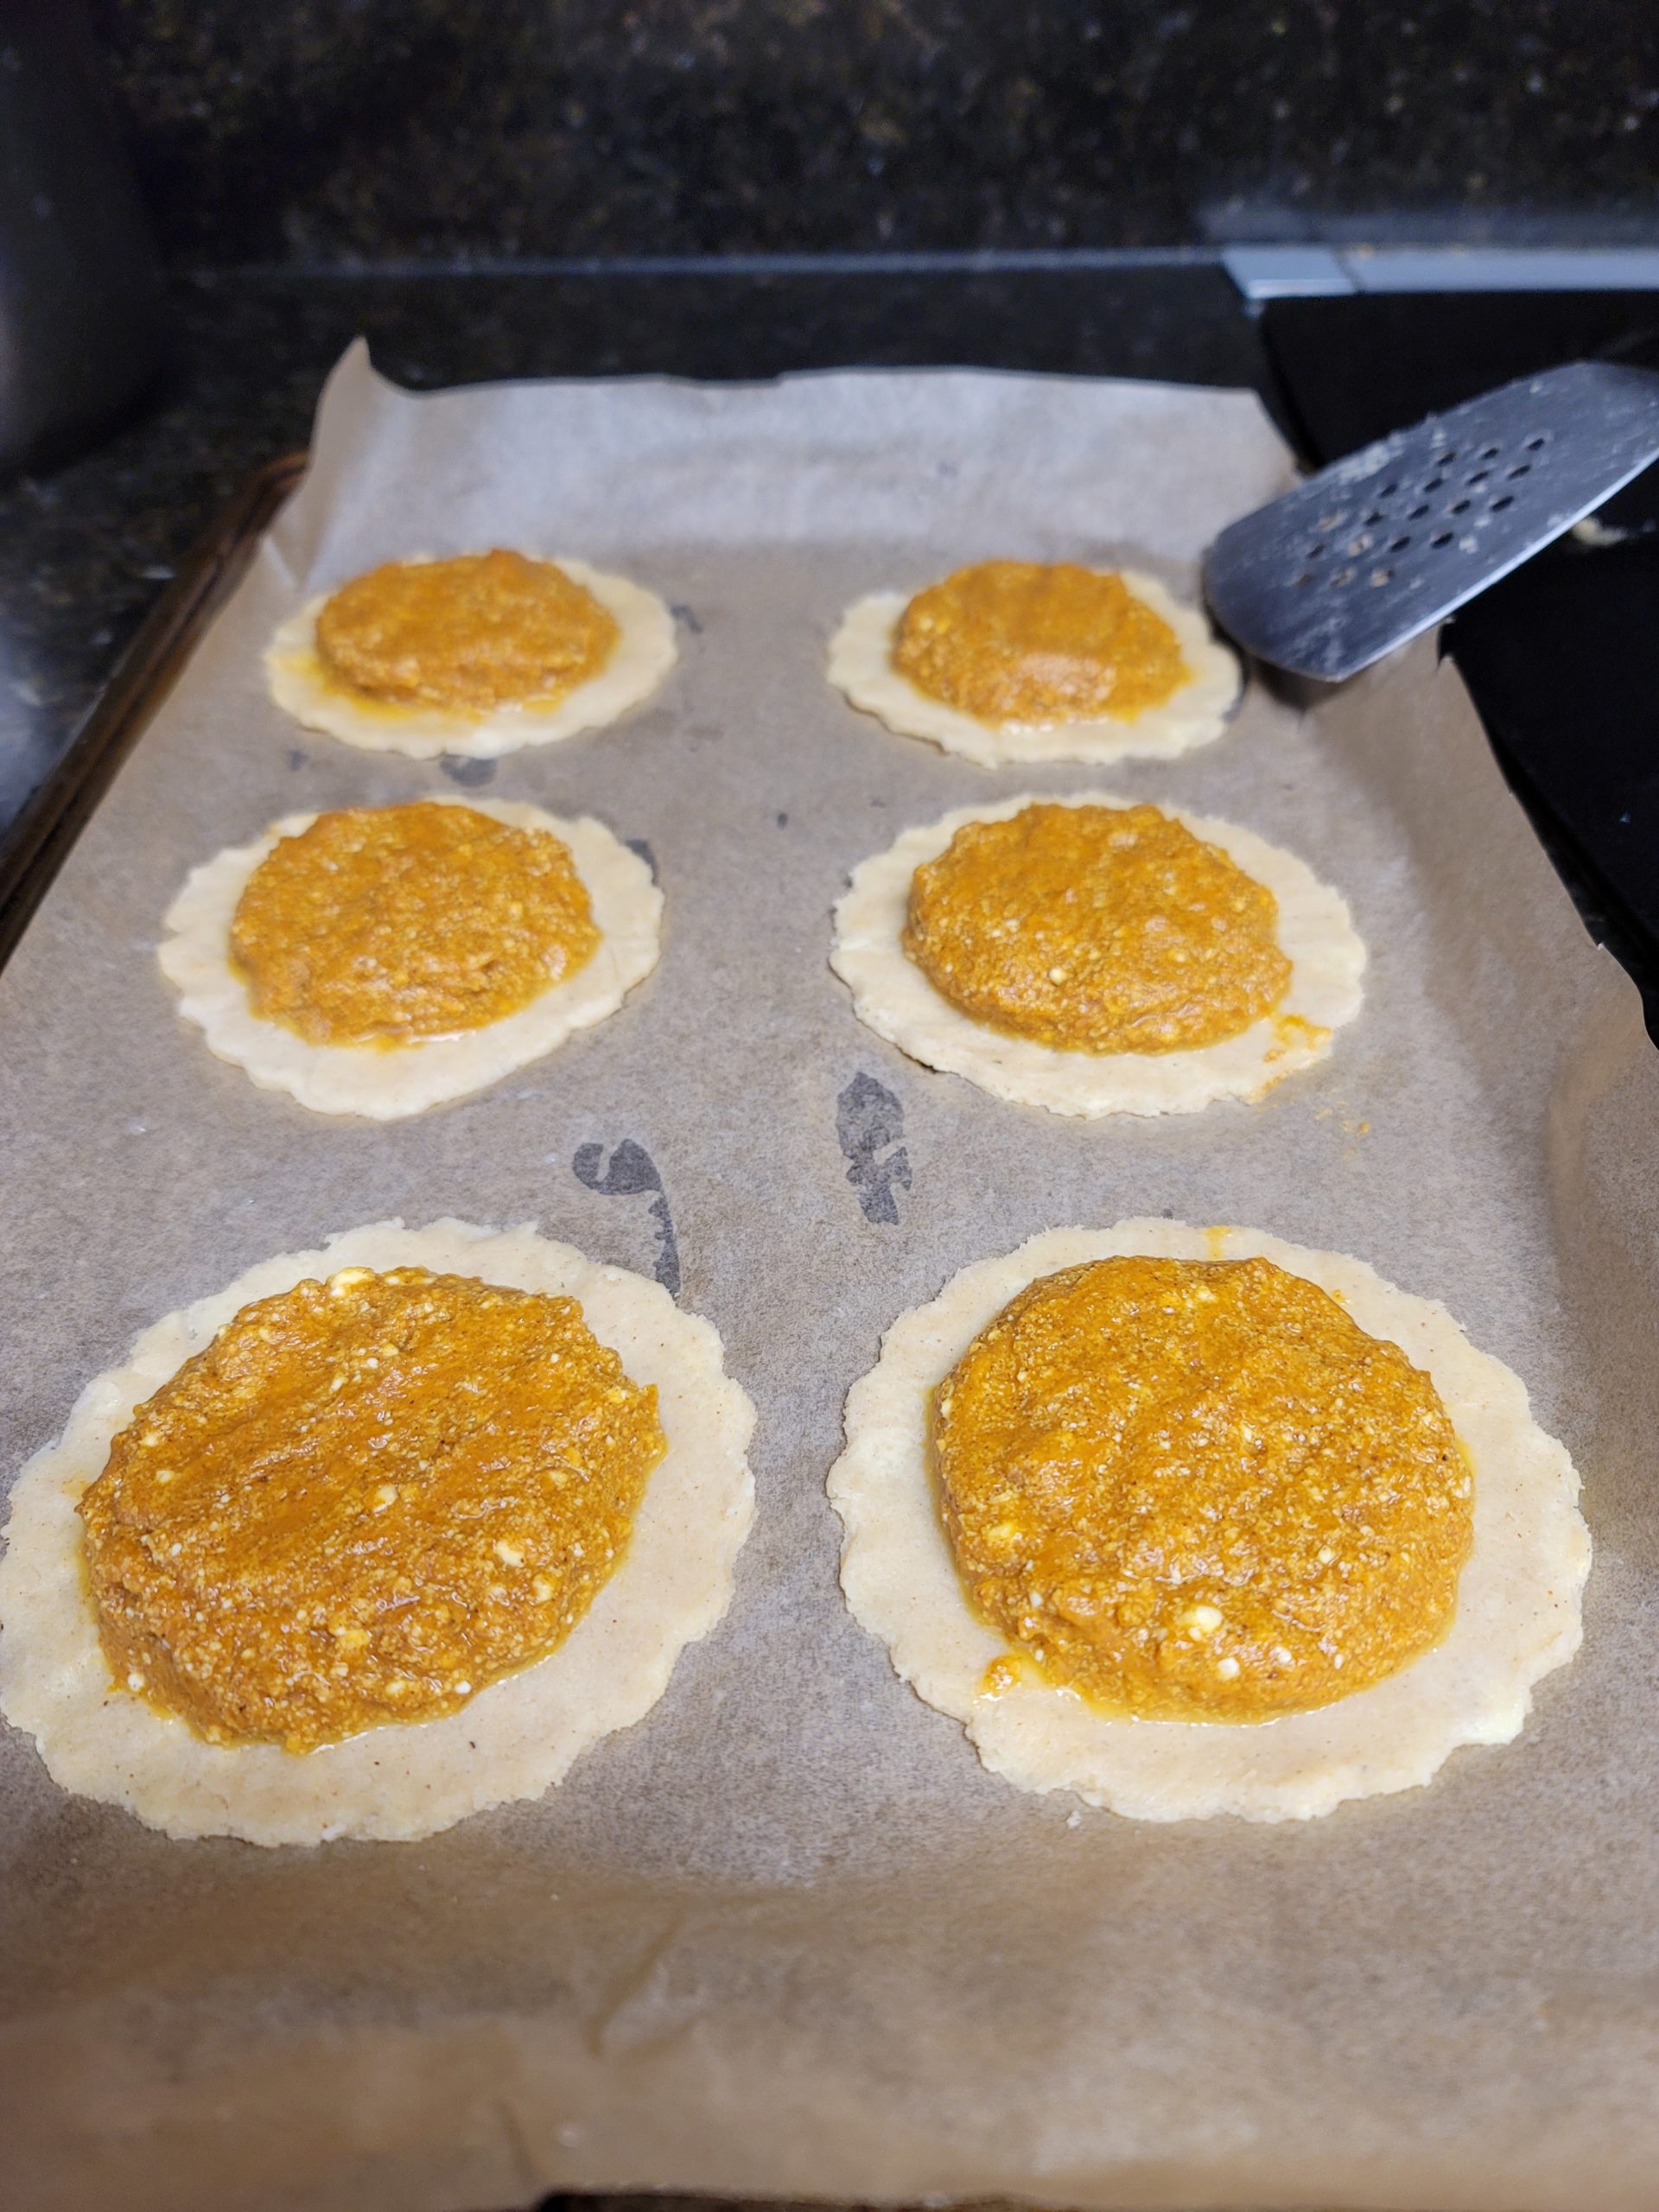
  13. Once you’ve gotten about 6 pie crust rounds onto the cookie sheet (or filled up the cookie sheet), use a tablespoon to take out a small portion of pie filling and put it in the center of the pie crust round. You want it to be about 1/3rd inch thick. You need to leave about 1/2 inch around the edge of the pie crust round empty so that we have room to seal the crust.
  14. Repeat step 10, get more dough from the fridge as needed to make the top layer pie crusts. While you’re rolling out any new dough you can put the cookie sheet with crusts on it in the freezer.
  15. Place the top pie crust rounds on top of the filling carefully and use your finger to push the edges down to meet the lower pie crust. Just your finger’s heat should be enough to seal it.
  16. Once you’ve covered all the filling and pressed the edges together put the cookie sheet with the sealed pies into the freezer for 10 minutes. You may have extra dough left over, you can put this into a ziplock bag and keep it in the freezer or bake it on the side as shapes for extra pie pieces. Try some easy lightning shapes or just make it into sticks and dunk it into the leftover pie filling to use it up.
  17. Pull the sealed pies back out of the fridge and use a fork to push the edges down. Push down and keep it down and pull away from the center to keep the texture. If you just push into the dough and then pull upwards often the dough will stick and just ruin the texture. This provides a better seal but also gives a slightly different texture to the dough on the edges that tastes great. 
  18. Use a butter knife to cut vents into the middle of the handpies. You can make an easy zigzag for a lightning bolt shape if you’re making them Harry Potter themed.
  19. Put the cookie sheet with the pies back into the freezer
  20. Create your egg wash by cracking an egg into a bowl and whisking it. Wash a basting brush and put it into the egg wash so it’s ready and you can work quickly. 
  21. Pull the pies back out and brush their tops with the egg wash.
  22. Put the pies back into the freezer and set a timer for 30 minutes for them to freeze in shape. If you skip this step the pies will be more likely to melt and lose their shape.
  23. Once the pies have been in the freezer for 30 minutes keep leaving them there and preheat the oven to 400F. Let the oven come up to temperature completely so that the pies cook more evenly.
  24. Place the cookie sheet into the oven for 10 minutes. Take the pan out and rotate it and put it back in for 5 minutes. This is to make sure they are evenly browned. From here you’ll need to check on the pies every 5 minutes until they are golden brown all over. This can take 20-30 minutes for most ovens. Remove from oven and allow to cool 5 minutes before serving.
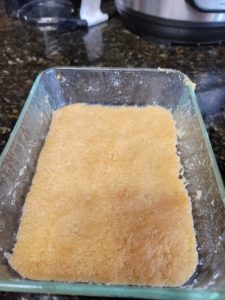
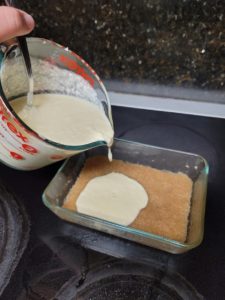
 

Image Recipe

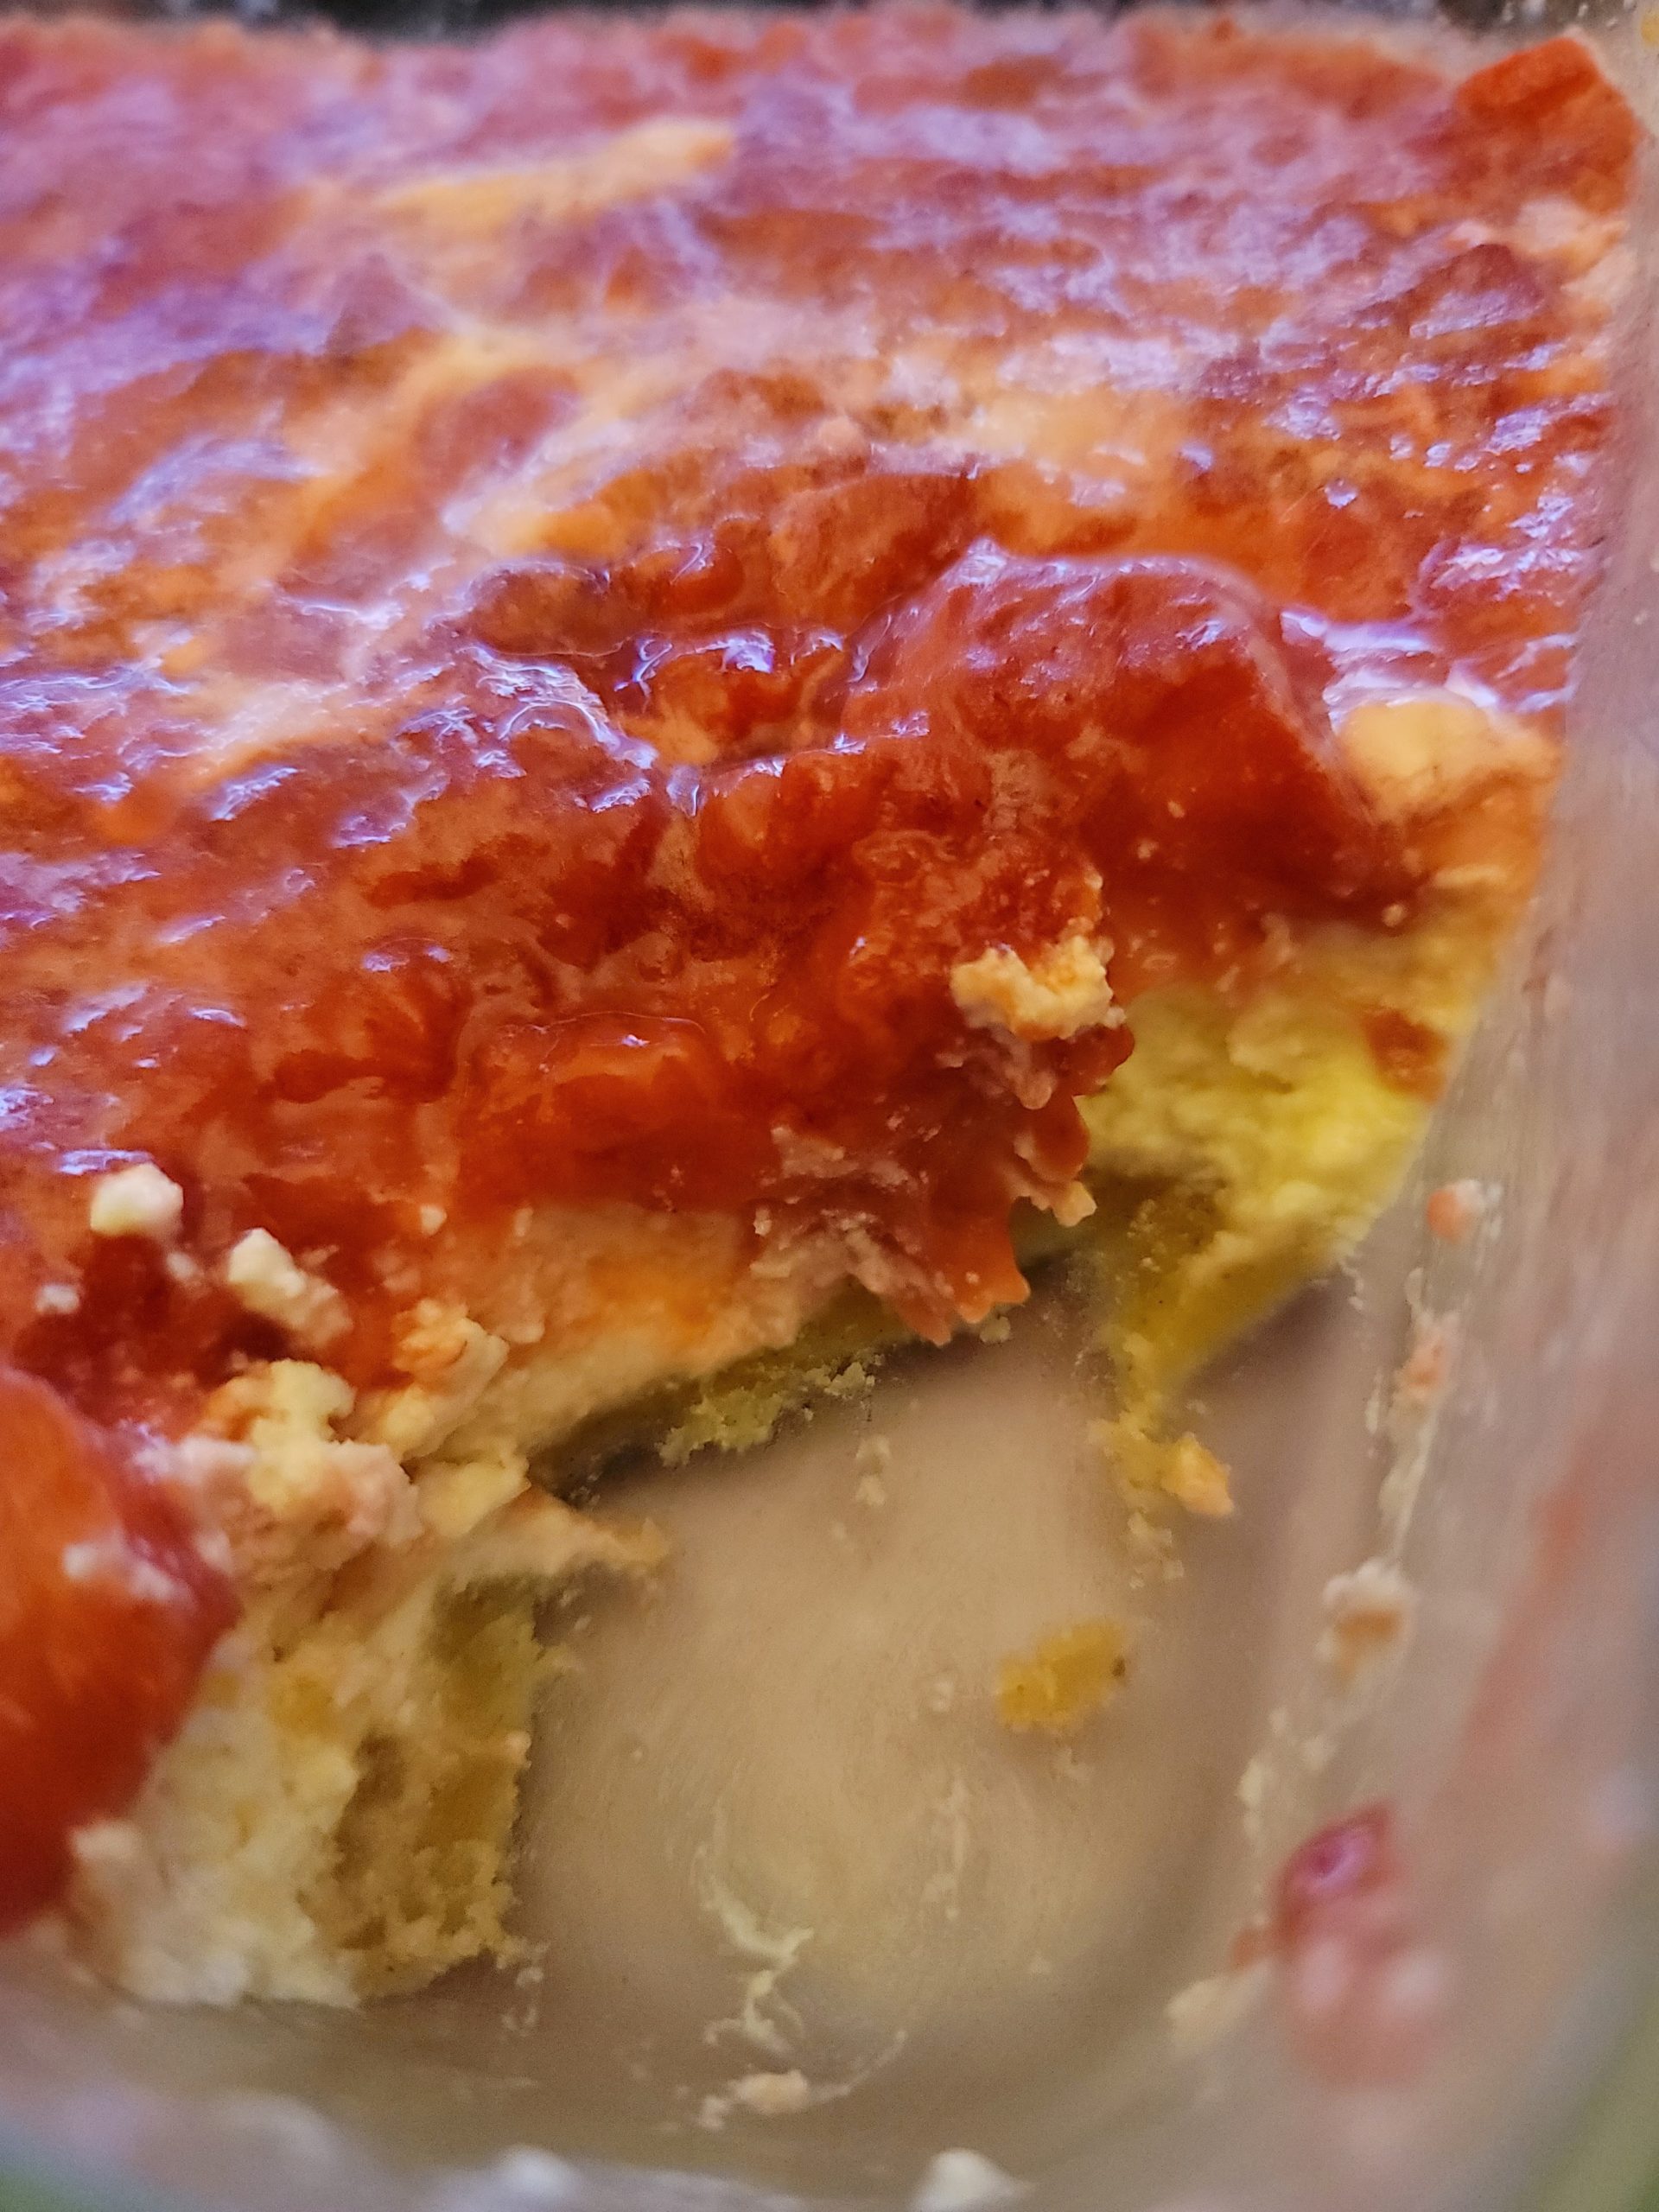
I don’t intend to make a full image recipe for this at this time but I wanted to show what the filling looks like on the bottom pie crust.


Things I’d like to try:

  • Adding a bit of lemon juice to the dough or filling to further counter the sourness of the mascarpone cheese. ACV to the filling may also work
  • Weighing the recipe instead. Measuring cups are adding some variability to the structure of the dough. (sometimes it falls apart). I may also just need to up the coconut flour.
  • I noticed one brand of mascapone was thicker than the other. This may play a part in the dough structure so I’ll need to test and see what the differences are. The thicker brand may work better for dough. When I used the softer brand it was softer dough but not sure if I just needed to freeze it more.


Keto Almost Peanut Butter and Jelly Sandwich

Crispy, buttery toast is topped with almond butter and strawberry puree for a keto twist on the standard peanut butter and jelly sandwich. I remember when I was young my mom had a sandwich press to make PB&J sandwiches that would seal in the filling and if you have one this is an awesome time to use it. If you’re like me and you can’t really justify yet another kitchen gadget then feel free to make it stovetop on a regular pan, just prepare to eat this one with a fork! Without the sugar of a traditional jam the strawberries won’t just stay in place–but they still taste great.

You can make this as an open-face sandwich (aka just 1 piece of bread) in order to cut back on the carbs. If you like the taste of bread on both sides like I do you can simply fold your 1 piece of bread diagonally into a triangle. While you may have fond memories as I do of a PB&J being a decent meal keep in mind with keto that this is a fair amount of carbs–so personally I treat this as a dessert. It’s a great dish for those of you doing the #unsweetketochallenge! 

Make sure you get almond butter with no sugar added. The best almond butters come in a glass jar and have only one ingredient: almonds. My favorite by far is the Once Again Natural Creamy almond butter. 

Want an even more delightfully sweet sandwich? Replace the strawberries with a bar of Choczero Milk Chocolate Hazelnut and let it melt into the almond butter.  You’ll have something very similar to a Nutella Sandwich with a bit of a crunch.

Keto Jam

I made this recipe before this product existed, but Choczero now carries Strawberry Jam! I quite like it, but I don’t always have it on hand and it’s not always in stock. Of course, plain strawberries are healthier than a product mixed with sweeteners, but it’s an option.

Keto Almost Peanut Butter and Jelly Sandwich

  1. Place your strawberries into a microwave safe bowl and microwave for 30seconds-1minute until you can easily smash them with a spoon to create a puree. This will be your “jam”. (If you really need it sweeter you can add a tablespoon of erythritol or erythritol/monkfruit blend and stir).
  2. Turn the stove on to medium. Put the bread directly into the pan with no butter. Wait until the bottom just barely starts to turn brown before you flip it over. (If you’re like me and keep your bread stored in the freezer this can take a few minutes)
  3. As the other side is toasting, drop a knob of butter per each slice of bread into the pan. It’ll start to melt and you can use the spatula to drag the bread over the melted butter. Flip the toast to coat the other side in butter as well. 
  4. Add the almond butter and spoon out some strawberry puree onto the toast. You may wish to let this toast a little longer so the fillings can warm up slightly.

Keto Microwave Cheesecake Bars

Recipe Notes

This is an easy recipe you can whip up very quickly, but it does need to set in the fridge for about 3hrs+ in order to set properly. All you need is a microwave and a fridge so it makes it a great meal for the students out there living in dorms. The great news is you don’t even have to add additional sweetener! You don’t want to eat the whole thing at once, I make these in my 3-Cup Pyrex containers so I can easily just pop a lid on and save some for later.

Ingredients

  • Sweetener — If you’d like to add sweetener, you could use 1 tablespoon of erythritol when you’re mixing the cheeses together. However, even for someone used to sweeteners, I think the strawberries and lemon juice in this recipe offer a lot of sweetness.
  • You can also use fresh strawberries and simply slice them and put them on top, laid out flat. Or dice them and microwave them for 1 minute and then spread them on top of the cheesecake similarly to the frozen. Microwaving the strawberries will allow you to spread them more evenly and it will taste a little sweeter instead of tart.

Equipment

Keto Microwave Cheesecake Bars

Crust:

  • 2 Tablespoons Butter
  • 6 Tablespoons Almond Flour
  • 1 teaspoon Pumpkin Pie Spice

Cheesecake:

  • 8 Tablespoons Ricotta Cheese
  • 4 Tablespoons Cream Cheese
  • 2 Tablespoons Heavy Cream
  • 1 teaspoon Lemon Juice
  • 1 teaspoon vanilla extract
  • 1 Large Egg
  • ~10 Strawberries

Directions:

  1. I use the 3-cup Pyrex rectangular glass containers(7.25” wide x 5.5” deep x 1.75” high).
  2. Microwave the butter for 45seconds or until it’s melted.
  3. Add the almond flour and pumpkin pie spice and stir with a spoon.
  4. Use the back of the spoon to flatten out the mixture into the bottom of the container.
  5. In a separate bowl (or use a glass measuring cup so it’s easier to pour) microwave the cream cheese for about 30 seconds to soften it.
  6. Add the ricotta, heavy cream, lemon juice, vanilla extract and stir.
  7. Add the egg and stir. Try to get the mixture as smooth as possible. You can press the cheeses against the side of the bowl to break them down further.
  8. Pour the mixture on top of the crust.
  9. Microwave for 3 minutes. The center of the cheesecake will probably still be runny, that’s OK.
  10. While that’s microwaving wash the bowl you mixed the cheeses in and place the frozen strawberries in the bowl.
  11. Take out the cheesecake and microwave the strawberries for 2 minutes.
  12. While the strawberries are still hot you should be able to easily chop and smash them in the bowl using just the spoon to turn it into a sort of jam-like consistency.
  13. Pour the strawberries on top of the cheesecake and try to even out the layer with the back of the spoon.
  14. Cover the container with a lid and put in the refrigerator to chill and set. The cheesecake must cool completely for the texture to be correct. (About 3 hrs)
  15. Enjoy. Makes 2 servings to split or save for later.

IMAGE RECIPE

  1. I use the 3-cup Pyrex rectangular glass containers(7.25” wide x 5.5” deep x 1.75” high).
  2. Microwave the butter for 45seconds or until it’s melted.
  3. Add the almond flour and pumpkin pie spice and stir with a spoon.
  4. Use the back of the spoon to flatten out the mixture into the bottom of the container.

5. In a separate bowl(or use a glass measuring cup so it’s easier to pour) microwave the cream cheese for about 30 seconds to soften it.

6. Add the ricotta, heavy cream, lemon juice, and stir.

7. Add the egg and stir. Try to get the mixture as smooth as possible. You can press the cheeses against the side of the bowl to break them down further.

8. Pour the mixture on top of the crust.

9. Microwave for 3 minutes. The center of the cheesecake will probably still be runny, that’s OK.

10. While that’s microwaving wash the bowl you mixed the cheeses in and place the frozen strawberries in the bowl/measuring cup.

11. Take out the cheesecake and microwave the strawberries for 2 minutes.

12. While the strawberries are still hot you should be able to easily chop and smash them in the bowl using just the spoon to turn it into a sort of jam-like consistency.

13. Pour the strawberries on top of the cheesecake and try to even out the layer with the back of the spoon.


14. Cover the container with a lid and put in the refrigerator to chill and set. The cheesecake must cool completely for the texture to be correct. (About 3 hrs)

15. Enjoy! Serves 2, or save half for later.

Microwave Keto Strawberry Egg Loaf

This recipe tastes like a bread pudding and you may notice some jiggle in the middle still. Be careful to let the food sit in the microwave for a minute afterward–I’ve had this recipe explode on me when I moved it because of the air pockets. 

If you’re used to sweeteners you can certainly add a little of your choice to this recipe (before you add the strawberries). A tablespoon of erythritol would probably do for most folks. Or 15 Monkfruit Drops.

Why No Sweetener? #UnsweetKetoChallenge

Even keto sweeteners can have negative effects. Many of them cause an upset stomach, and they can still spike insulin thanks to the sympathetic nervous system. In 2019 I tested going without any kind of keto sweetener except berries or tea for a month–and was surprised to lose the most weight I had ever lost in a month, my skin cleared up, my energy was up, my inflammation was down, and I could think more clearly. 

Although I don’t think I’ll ever completely cut out keto sweetener desserts I almost never have them now. Desserts like this keep me on track and are satisfying now that I’m used to no sweetener. 

Microwave Keto Strawberry Egg Loaf

Ingredients:

2 tablespoons Butter

2 tablespoons Cream Cheese

2 Tablespoons Heavy Cream

1 Egg

5 or so frozen strawberries

1.) Put the butter and cream cheese in a bowl and microwave for 30 seconds to soften it.

2.) Add the heavy cream and stir the ingredients. It won’t be completely smooth.

3.) Add the egg and stir until it’s an even consistency, it probably still won’t be completely smooth.

4.) Add the strawberries, spread them out.

5.) Microwave 2 minutes. Let sit in the microwave 1 minute, then enjoy!

Keto Strawberry Cereal aka “Stuff in Milk”

Even keto sweeteners can have negative effects. Many of them cause an upset stomach, and they can still spike insulin thanks to the sympathetic nervous system. In 2019 I tested going without any kind of keto sweetener except berries or tea for a month–and was surprised to lose the most weight I had ever lost in a month, my skin cleared up, my energy was up, my inflammation was down, and I could think more clearly. 

Although I don’t think I’ll ever completely cut out keto sweetener desserts I almost never have them now. “Desserts” like this keep me on track and are satisfying now that I’m used to no sweetener. 

Although this is a far cry from my old days of Captain Crunch, I find this cereal to be quite similar to corn flakes with berries.

For a sweeter version that is similar to Special K’s chocolate cereal, you can do something like Choczero’s Chocolate Chips instead of Strawberries. You could also sprinkle about a tablespoon of erythritol over the cereal to make it more similar to frosted flakes, although I personally find the aftertaste fairly strong from doing this. 

Keto Strawberry Cereal aka “Stuff in Milk”

1/2 cup sliced almonds

1/2 cup coconut flakes

1 tablespoon almond butter

5 or so frozen strawberries

Almond milk, as much as you like for your cereal

1.) Put the frozen strawberries in a bowl, microwave for 1 min. Microwave longer if needed to get them defrosted enough to eat. I like mine still a little cold.

2.) Stir up the strawberries and slice them with a spoon so they’re smaller. This will give you more bites of cereal with strawberries. 

3.) Add the almond slices. Then add the almond butter. Then add the coconut flakes. Add about half the amount of almond milk you’re going to want and stir the ingredients to bring it all together. Then add the rest of the almond milk as you like.

Keto Turtle Microwave Cookie

KetoAim Microwave Keto Turtle Microwave Cookie

2 Tablespoons butter
6 Tablespoon almond flour
1 Dash Pumpkin Pie Spice
1 Dash Salt
1 Tablespoon Lakanto Golden Monkfruit/Erythritol Blend Sweetener
1 Tablespoon Jordan’s Caramel Skinny Syrup
1/4th tsp Vanilla Extract
2 Egg Yolks

Mixins:
2 Squares Choczero 50% Dark Chocolate, chopped (Or any keto chocolate, about 1/4th cup)
2 Tablespoons Chopped Walnuts
Drizzle of Walden Farm’s Caramel Syrup(Sauce) or make your own

INSTRUCTIONS
1.) Microwave the butter for 30 seconds in a glass container. (I use 7.5 x 5 inch pyrex)
2.) Add the rest except the mixins, stir until smooth. Make sure you get all the clumps smoothed out by pressing your spoon into the the clumps to break up the almond flour.
3.) Add your chocolate and walnuts and stir them in, try to make sure they are spread out pretty evenly or you will get bites of unflavored cookie.
4.) Drizzle the Walden Farm’s Caramel sauce on top. Run your spoon through the batter to incorporate it better.
5.) Microwave 1 minute 30 seconds. Let cool for 1 minute. Enjoy!- April 08, 2019No comments:  Email ThisBlogThis!Share to TwitterShare to FacebookShare to Pinterest